In this section we will go through all the navigation options and how to set up the workspace and save it how you find it most useful. Both workspaces and keyboard shortcuts can be saved into particular files that you can copy to different machines, which makes it easy to stay consistent with your preferred options. The user interface of Photoshop can be frightening and overwhelming for new users with the endless number of buttons, keyboard shortcuts and hidden options, but after spending some time with understanding it you will find it easy. Photoshop is a very user friendly application. You can change nearly everything from the locations of the panels to the keyboard shortcuts of every option.
Parts of this series:
1. Digital Image Theory
2. Working with Bridge
3. User Interface
4. Making Selections
5. Tonal and Colour Adjustments
6. Working with Layers
7. Retouching Images
Workspace and keyboard shortcuts
First you need to learn the separate parts of the user interface and how to interact with them. You can save your preferred look of the interface as a user workspace. Of course you can save more workspaces if you want for separate workflows.
Keyboard shortcuts are highly recommended for every Photoshop user for they can save you the most time. The best way to work with Photoshop is to grab the mouse or pen (if you use a tablet) in one hand and place your other hand always over the keyboard. If you have never used keyboard shortcuts before it is high time to start and get used to using them whenever you can. Keyboard shortcuts can also be changed and saved as user shortcut options.
The user interface of other Adobe applications are very similar to Photoshop’s interface so if you learn it once you will find it easy to start working for instance with Illustrator or InDesign.
Navigation
It is very important to learn how to navigate in Photoshop, how to change your view. Mostly you will need to pan around and zoom in and out.
Some useful keyboard shortcuts:
– pan around: Space+click (hand tool)
– zoom in:
– Ctrl/Cmd+’+’
– Ctrl/Cmd+Space+click
– Alt/Option+scroll with mouse wheel
– zoom out:
– Ctrl/Cmd+’-‘
– Alt/Option+Space+click
– Alt/Option+scroll with mouse wheel
– press and hold H (bird’s eye view)
– Ctrl/Cmd+0 (fit to screen)
When you work with more images you will need to use the Arrange documents option.
Tools
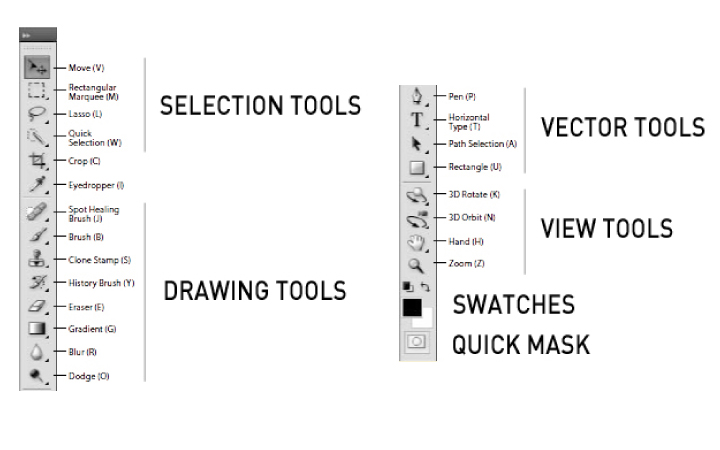
The tool bar shows you all the tools you are going to use in Photoshop. Most of them are tool groups, which can be expanded by clicking and holding the mouse button over them.
On the right you see the default keyboard shortcuts of the tools and you see how they are divided into sections.
At the bottom of the tool bar you find the swatches. You can change the colours by clicking on the swatches. Here are some useful keyboard shortcut for the swatches:
– default colours: D
– change foreground and background colours: X
– fill with foreground colour: Alt/Option+Backspace
– fill with background colour: Ctrl/Cmd+Backspace
The last icon on the tool bar is a special view called Quick Mask mode. You can use Q to switch back and forth between normal and quick mask mode.
Layers panel
Layers panel is your most important panel in Photoshop, which you will use most of the time. You have lots of options available from this panel.
First it is good to set the thumbnail size and the view option for the thumbnails by right clicking on a blank part of the layers panel.
The most important things you need to do in the Layers panel:
– changing order of layers by dragging them
– turning visibility on and off
– renaming a layer by clicking on its name
– deleting a layer (Backspace)
– duplicating layers by Alt/Option dragging them
– grouping layers together (Ctrl/Cmd+G)
– changing the opacity (0-9)
– making a normal layer from background (double clicking on the name of Background layer)
– making a selection around the edges of a layer by Ctrl/Cmd click on the thumbnail of a layer
– adding layer styles by double clicking around the name of a layer
– changing the blend mode of the layer
Blend modes
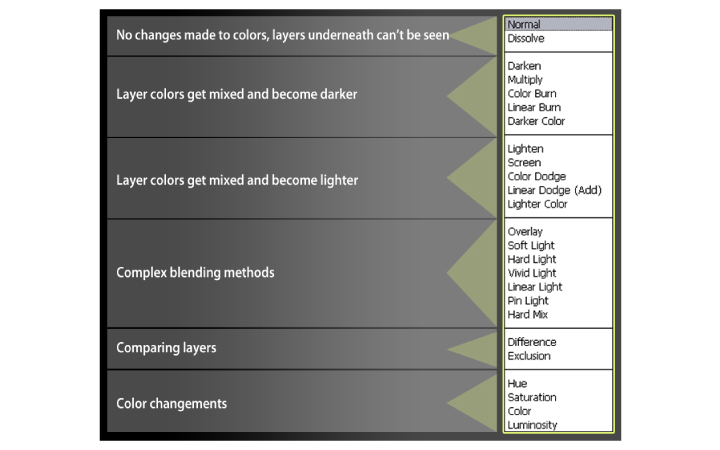
Blend modes are special ways to mix layers with each other without changing their opacity. You need at least two layers to be able to use blending.
There are lots of blend modes available but it is really hard to determine exactly when and where to use them because they are very versatile.
The best is to experiment with them and see how they work with different images. You will always find some interesting effect by using blend modes.
The most useful ones are:
– Normal: default
– Multiply: darkens the colours of the layers
– Screen: brightens the colours of the layers
– Overlay: complex blending increasing contrast
– Soft light: same as Overlay but softer
– Colour: blending colours of top layer to layers below
To be continued soon…
Please don’t forget to comment
and follow the page on Facebook and on Twitter!


