
Everything happens on layers what we do in Photoshop. You can work on only one layer or merge your layers, but the professional way is to keep every element on a separate layer. This way you will always be able to change your composition. We already discussed the Layers panel and its options, but there are lots of other features in Photoshop related to using layers. In this section we are going to focus on tools that you can use on layers and how to use special layers.
Parts of this series:
1. Digital Image Theory
2. Working with Bridge
3. User Interface
4. Making Selections
5. Tonal and Colour Adjustments
6. Working with Layers
7. Retouching Images
Canvas size and Crop tool
Canvas size is the work area of your document, which is best to be measured in pixels. It is not the same as the Image size, which is for setting the print size. Canvas size is only dealing with adding and subtracting pixels to your document. You will find this option under the Image menu.
You can also use the Crop tool to make changes to your canvas. In this example I will show some less known but very practical ways to use the Crop tool.
Free Transform tool
The Free Trasform tool combines nearly all the layer transformation options.
You can do:
– scaling
– rotating
– moving
– flipping
– and changing perspective with Free Transform.
The keyboard shortcuts are the following:
– Ctrl/Cmd: perspective scaling
– Alt/Option: centralized scaling
– Shift: constrained proportions
– arrow keys: nudge by one pixel
– Shift+arrow keys: nudge by 10 pixels
You can use Free Transform with more than one layers at the same time if you select the layers before starting using it.
Be careful not to scale up and down layers too much because you lose quality every time. The only way to make scaling nondestructive is to use Smart objects. We will discuss them soon.
Drawing with the Brush tool
The Brush tool is the most important drawing tool, which has two main properties:
– brush size (diameter)
– hardness (feather level on the edges).
Keyboard shortcuts:
– Alt/Option: sampling colour from the image
– Shift: drawing vertical and horizontal lines
– [ and ] : changing the brush size
– Ctrl+Option+click (on Mac): dinamically change brush size
– Ctrl+Shift+right click (on PC): dinamically change brush size
– . and , : changing brush
– 0-9 : changing the opacity of the brush
There are lots of options in the Brush panel where you can fine-tune the behaviour of your brush presets.

Clipping masks
Clipping mask is a special link between layers. If you want to channel the effect of an adjustment layer to only one layer you can clip the two layers together. To do this you only need to Alt/Option click between the two layers in the Layers panel. Clipping masks are indicated with a downpointing arrow.
The bottom layer is always the mask and the layer(s) on top of it are the clipped layers.
You can also use clipping if you want use the contours of a layer for changing the visibility of other layers. Again you need to put the mask layer (with the contours) below the other layers and then Alt/Option click between them to clip them together.
Layer groups and layer comps
It is very important to always organise your work in Photoshop. It saves you time if you use layer groups and name your layers.
You can even use Layer comps if you want to make several versions with the same layers in one Photoshop document. It won’t increase the file size and makes it easier to store versions on your computer.
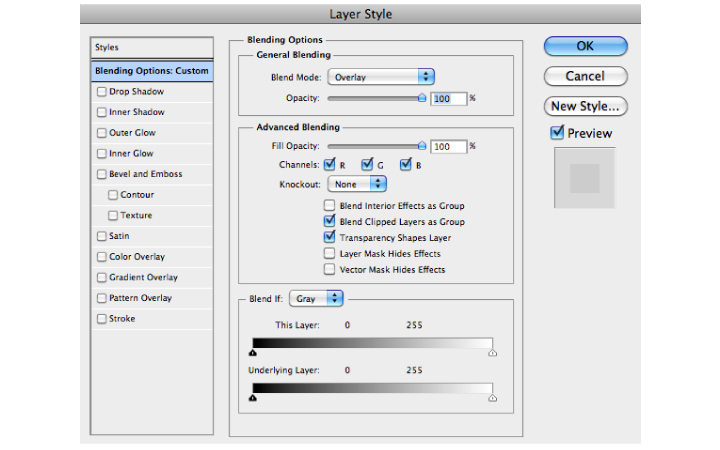
Layer styles
Layer styles are nondestructive effects you can add to each of your layers by double clicking on them in the Layers panel.
You can turn the effects on and off by simply clicking on the eye icons in front of their names under the layer thumbnail and you can always change their values if you double click on them.
You can copy layer styles applied to a layer to another one if you Alt/Option click and drag the FX icon from one layer to the other. If you don’t add the Alt/Option key you will move the styles instead of copying them.
If you want to use different shadow values on separate layers you should turn off the Global light option.
You can save layer styles with the Styles panel and use them in other documents.
Type layers
Type layers are special, vector layers, which means that they are resolution-independant until you rasterize them. To create a type layer you can click with the Type tool in the image or click and drag to draw a frame for the type. In the frame Photoshop will automatically break lines for you and will use hyphenation. If you want to break a line manually you should use the Enter and if you want to finish typing you can use Ctrl/Cmd+Enter. You have lots of options to change the type and the easiest way to return back to editing a type layer is to double click on the layer’s thumbnail, which will select the whole text.
Useful keyboard shortcuts:
– Ctrl/Cmd+Shift+. and , : changing type size
– Alt+Up/Down arrows: leading
– Alt+Left/Right arrows: kerning or tracking
– Ctrl/Cmd+Shift+K: all caps
– Ctrl/Cmd+Shift+B: bold
– Ctrl/Cmd+Shift+I: italic
– Ctrl/Cmd+Shift+U: underline
Vector shape layers
Vector shape layers are also special layers with a color thumbnail and a vector mask. These layers are also resolution-independant just like the type layers.
You can always modify their shape by using the selection tools and changing their anchor points and curves. You can also save custom shapes with Edit / Define Custom Shape if you want to reuse a form that you created.

Layer masks
Creating layer masks is the best way to save your selections and make changes to them later on. A layer mask will always determine the visibility of a layer. You can only use grayscale colours in a mask and the most important rule is:
– Black always hides
– White always shows.
Some useful keyboard shortcuts by clicking on the layer mask’s thumbnail:
– Ctrl/Cmd+click: make selection from the mask
– Alt/Option+click: toggle the mask view
– Shift+click: turn the mask on and off
– Backspace: delete the layer mask
– Alt/Option+click and drag:
copy the mask to another layer
– Alt/Option+Shift+click: show the mask in quick mask view
– double click: change the settings for quick mask
You should always keep your layer masks but if you want to permanently delete the hidden parts of your layer you can right click on the mask’s thumbnail and apply the mask.
Smart objects
Every layer can be turned into a smart object by right clicking on the layer in the Layers panel and choose Convert to smart object option. This will create an embedded file in the PSD document, which will capture the original pixel size and quality of the layer. You won’t be able to make changes directly to smart objects, you will have to double click on their thumbnails to reach their source. After making changes to the source you will need to save the smart object file and return back to the image.
The advantages of smart objects:
– lossless quality while resizing the layer
– ability to merge layers together without losing them
– using filters nondestructively as Smart filters
– changing separate instances of the same smart object at the same time by changing the source
Adobe Illustrator graphics are opened in Photoshop as Smart objects. By double clicking on these special smart objects you will open the source vector files in Illustrator.
Sharpening and Smart filters
Filters are automatically added as Smart filters to smart object layers, which means that you can always come back and change their values.
Besides the possibility to change values to filter whenever you want you can even mask them with the Smart filter mask. In this example I will show the advantage of using Smart filters for nondestructive sharpening.
Align and blend images together
Align and blend images together
In the Edit menu you will find two extremely useful options:
– Auto-Align layers
– Auto-Blend layers.
With these options you can blend images together and make several interesting effects, like:
– panoramic images
– montages
– stiching scanned parts into one
– perfect group photographs, etc.
You should use Bridge to select the images that you want to blend together and choose Load files into Photoshop layers or Photomerge form the Tools / Photoshop menu.
To be continued soon…
Please don’t forget to comment
and follow the page on Facebook and on Twitter!
